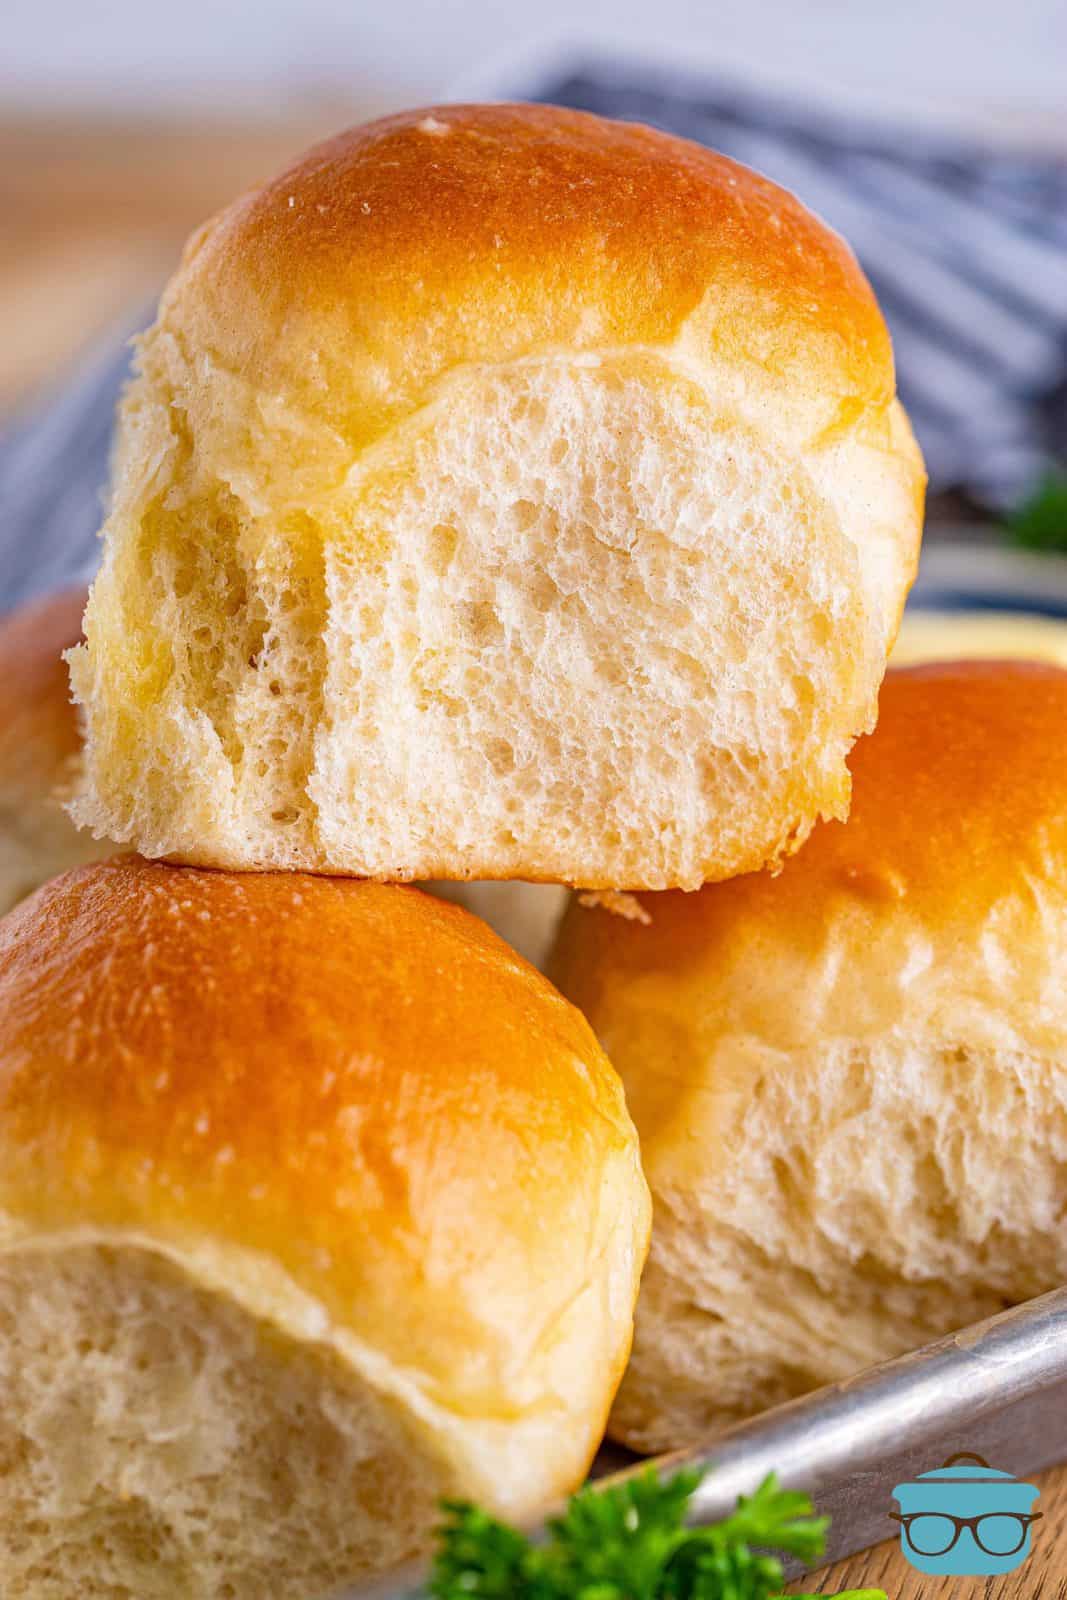
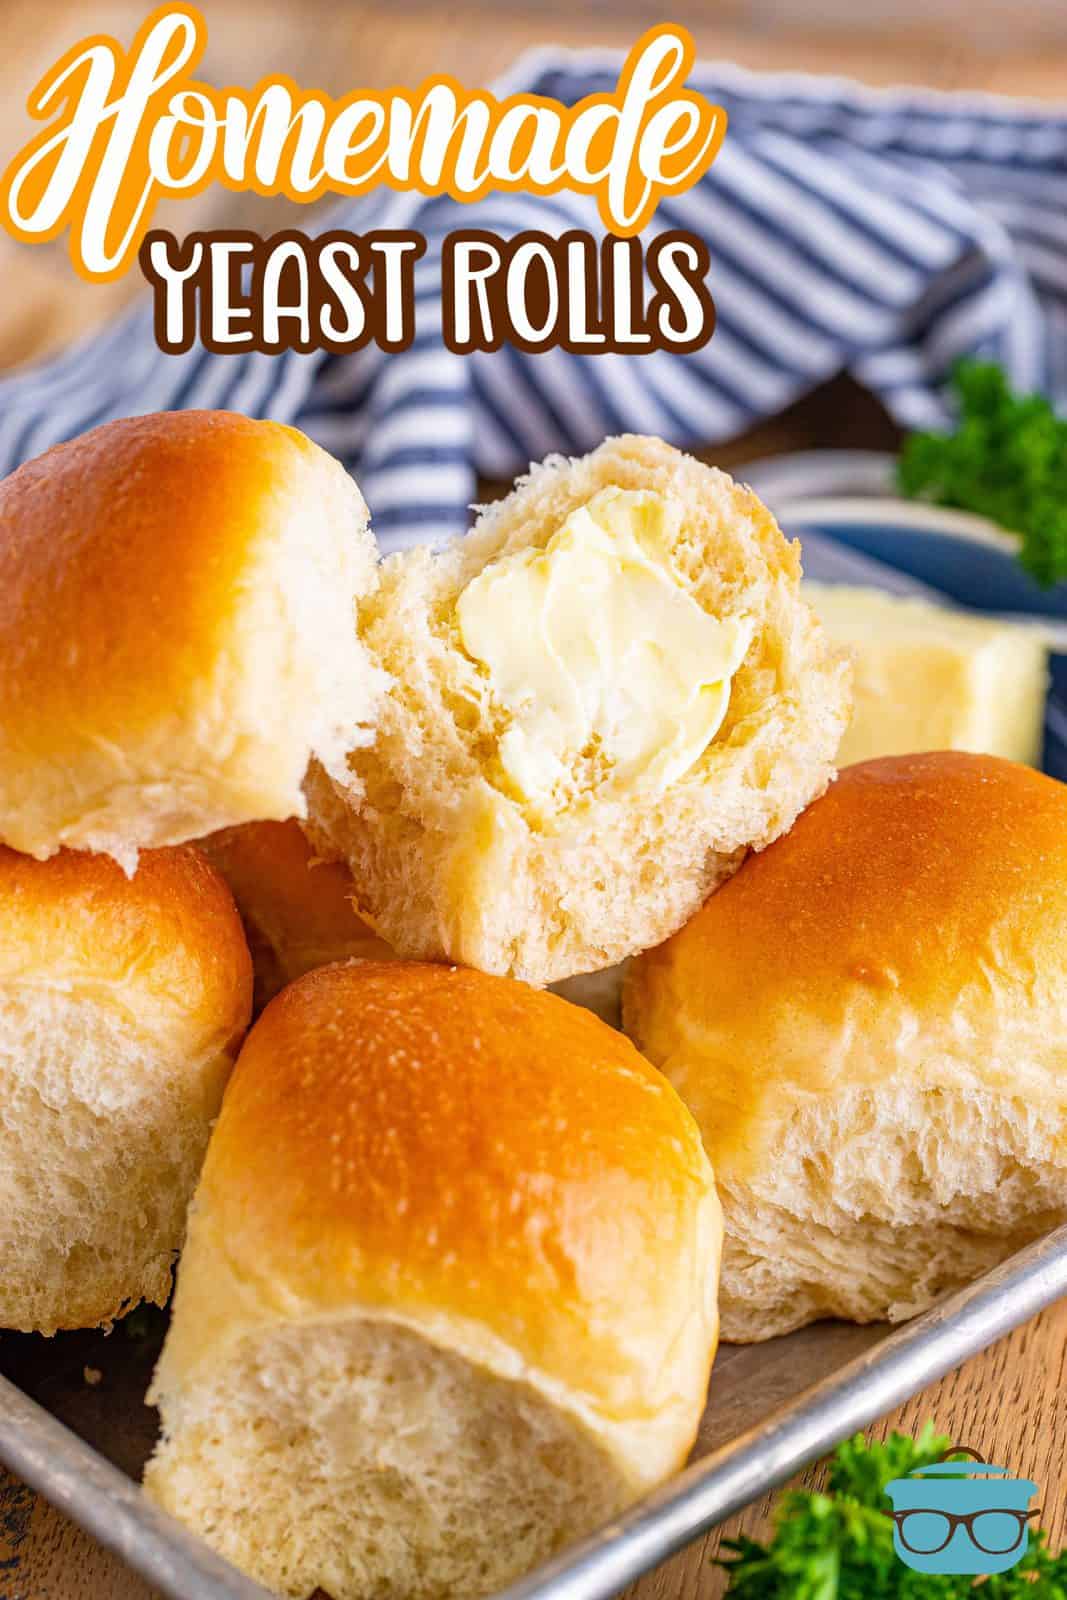
Homemade Dinner Rolls

These homemade Dinner Rolls are so light, fluffy and buttery! A delicious bread recipe that is a great accompaniment to any meal!
A DELICIOUS HOMEMADE YEAST ROLL RECIPE
One recipe that I think everyone should have is a good recipe for Homemade Yeast Rolls. I know some people can be intimidated by making bread and working with yeast, but trust me, there is nothing to worry about. Practice makes perfect and I work to make yeast recipes as easy and understandable as possible. I’ve even included a step-by-step video in the recipe card below. You will be so impressed with yourself for making them!!This is my go-to homemade recipe and it never fails me!

These rolls are absolutely amazing! This was my second year making them for Easter and everyone couldn’t stop saying how delicious they are and that I needed to continue to bring them!
– Sophia
FREQUENTLY ASKED QUESTIONS:
You can also stir/knead the dough by hand. You will need a little extra flour to keep your work surface floured (so the dough doesn’t stick). Do steps 1-3 the same way, except use a large bowl instead of a stand mixer. Stir the flour in with a sturdy spoon until a dough is formed. Then, place the dough on a clean floured work surface and knead the dough by hand for about 3-4 minutes until it is smooth and elastic-feeling. Go on to the next steps as stated.
For the way that this recipe is formulated, you cannot use instant yeast and will need to use regular active dry yeast.
If your liquid is too cold it will not activate yeast or if it is too warm it can kill the yeast. Remember yeast is a “living thing” so it likes warmth and food (the food is the sugar). I like to use a kitchen thermometer to check the temperature. You will want your milk to be between 105-110 degrees F. But you should be able to stick a clean finger in the water and find it very warm but not scalding hot.
They are the same thing. Depending on where you live, some folks call them dinner rolls and some call them yeast rolls. But they are both breads made with yeast. Some dinner rolls tend to be sweeter than a traditional yeast roll (like Hawaiian dinner rolls).
If the dough sits around too long after rising, it will start to flatten. You lose that airiness and they start to deflate. Basically you have “old dough” at this point. Now, you can still certainly bake them. They will still taste good but they won’t be as fluffy and the tops will be a tad crisp as opposed to soft. Also, sometimes too much flour is added to the dough. You want just enough flour for it to not stick to the sides of your mixing bowl.
Yes you can. They will rise slowly because they are in a cold environment rather than warm. You do have to let them come to room temperature before baking though. You will follow the directions below, pounding down the dough, forming into balls and putting into a baking dish. Cover with plastic wrap then put in the refrigerator. The next day, allow the rolls to come to room temperature, remove the plastic wrap and bake as directed.
Yes! See my recipe for Whole Wheat Dinner Rolls. Unfortunately you can’t just substitute white flour for wheat flour 1:1. You do have to adjust some of the other variables because wheat flour needs a bit more liquid than white.
Keep any leftovers in an airtight container on the counter for up to 5 days. These can also be frozen There are two different methods (before baking or after baking). If you want to freeze before baking, make your rolls and place them in a baking dish and then cover with plastic wrap and then foil and place in the freezer where they will keep for one month. Remove from the freezer and defrost in the oven and then cover with plastic wrap and let rise and then bake per instructions. To freeze already baked rolls, let cool completely and then place in a freezer bag. These will last in the freezer for up to 6 months. Let defrost on the countertop. You can also warm in the oven if desired.
INGREDIENTS NEEDED: (SEE RECIPE CARD BELOW FOR THE FULL RECIPE)
HOW TO MAKE DINNER ROLLS
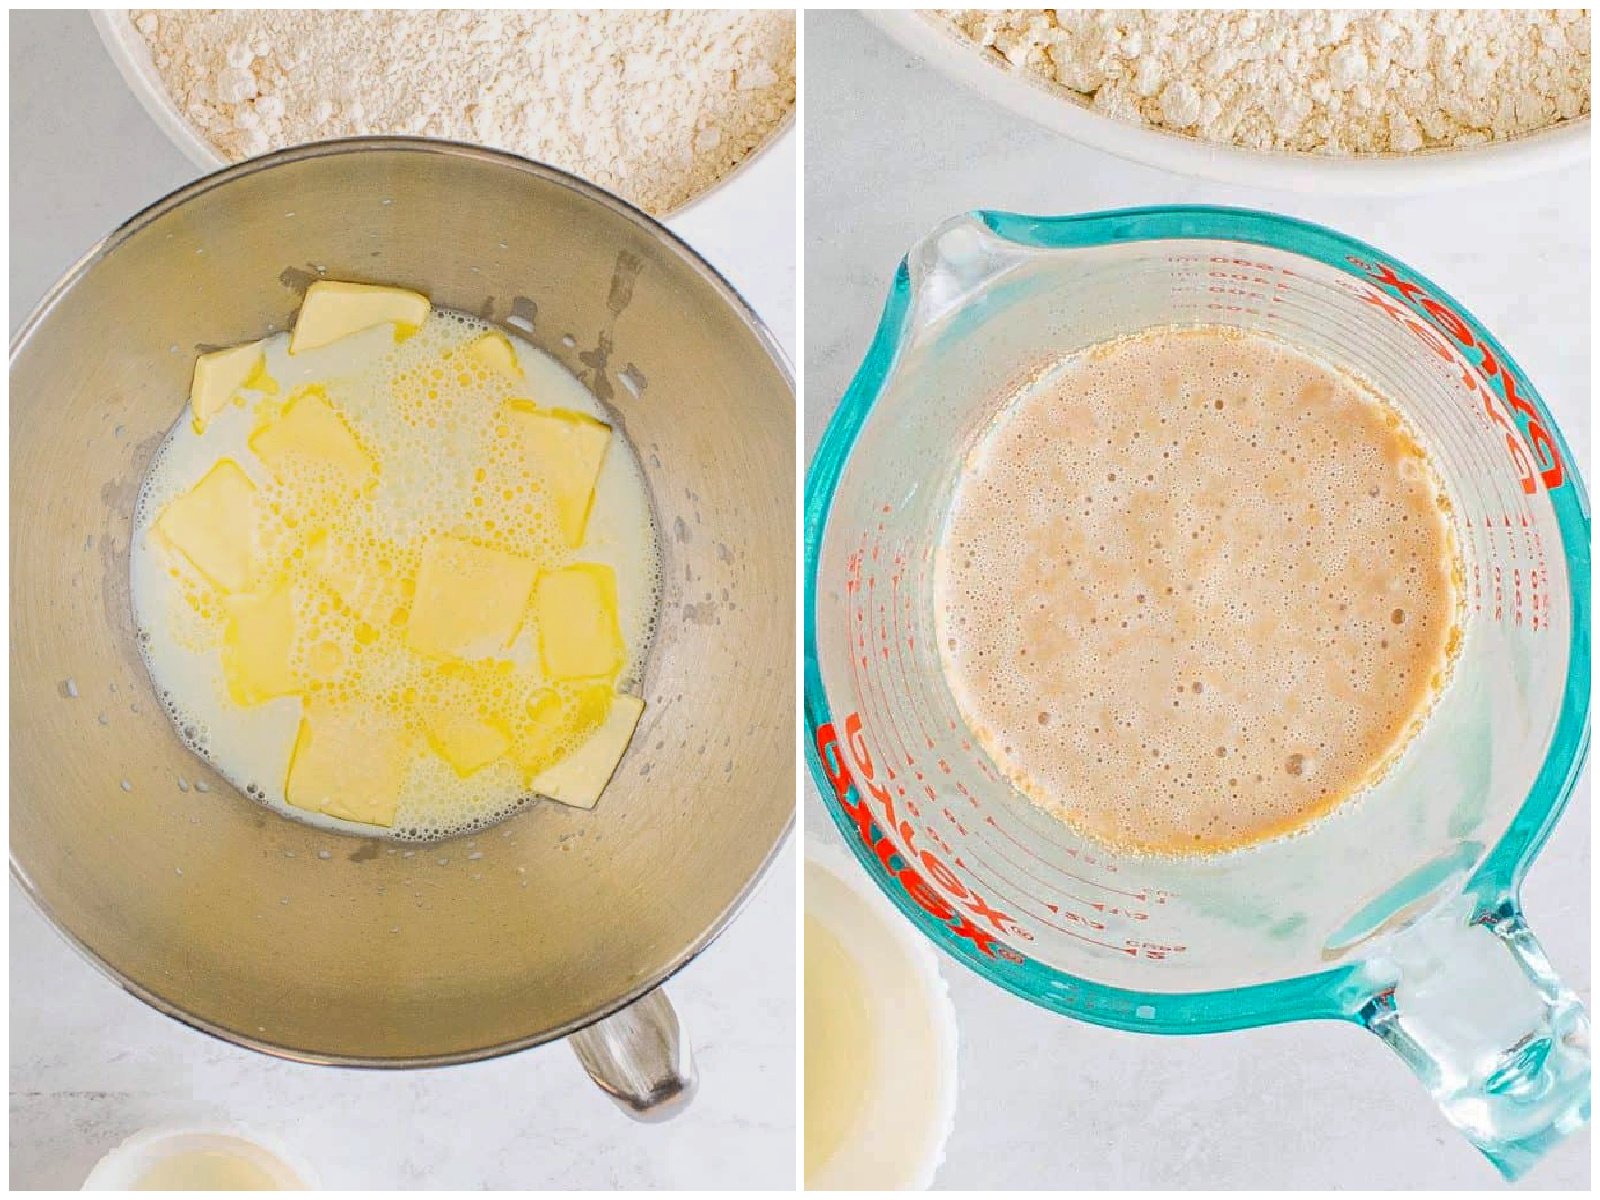
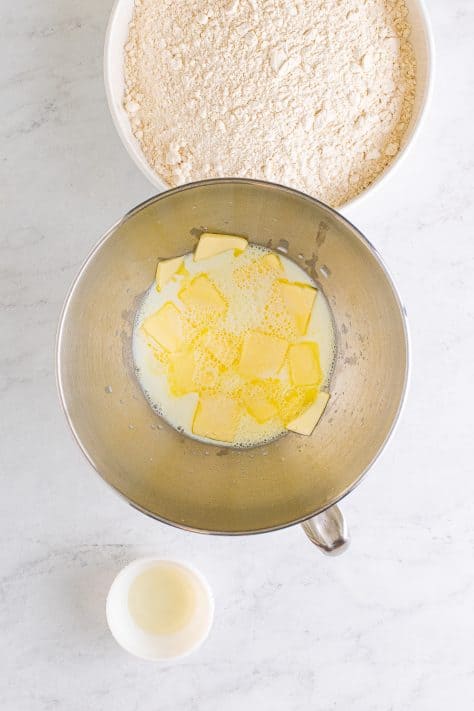
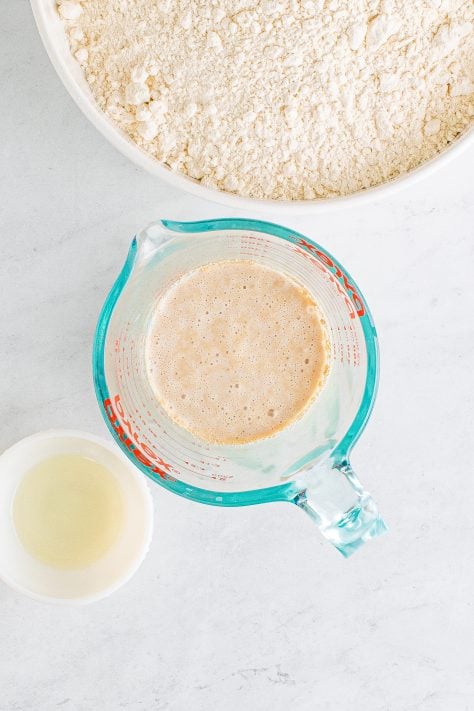
Take half of the butter and slice it as thin as you can. Add the slices to the bottom of a stand mixer. Add the sugar and salt to the mixer. Warm the milk in a microwave safe bowl in the microwave. I like to do this in 15-30 second intervals. We want the milk to be a temperature between 105-110°F (do not warm to over 110°F). Pour 1 cup of the warm milk into the bowl with the butter, no need to stir, just let it sit.
Add the yeast to the remaining milk and give it a stir. Let it sit for about 5 minutes, until foamy.
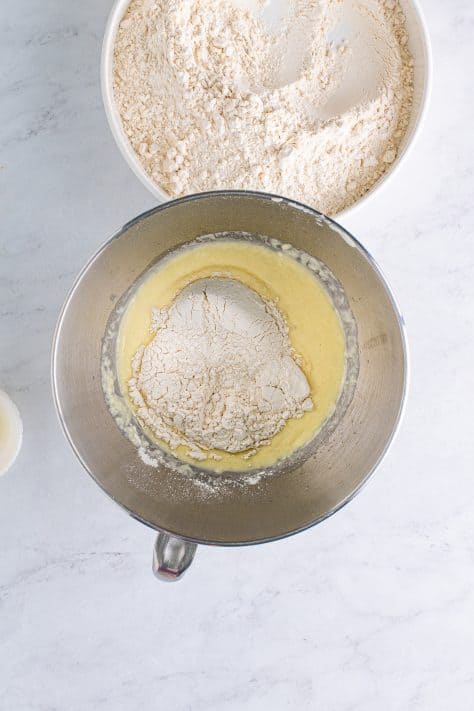
Add this mixture to the mixer. Add in the egg and stir everything to combine. Using the hook attachment, start stirring in the flour 1 cup at a time, scrape down the sides as needed.
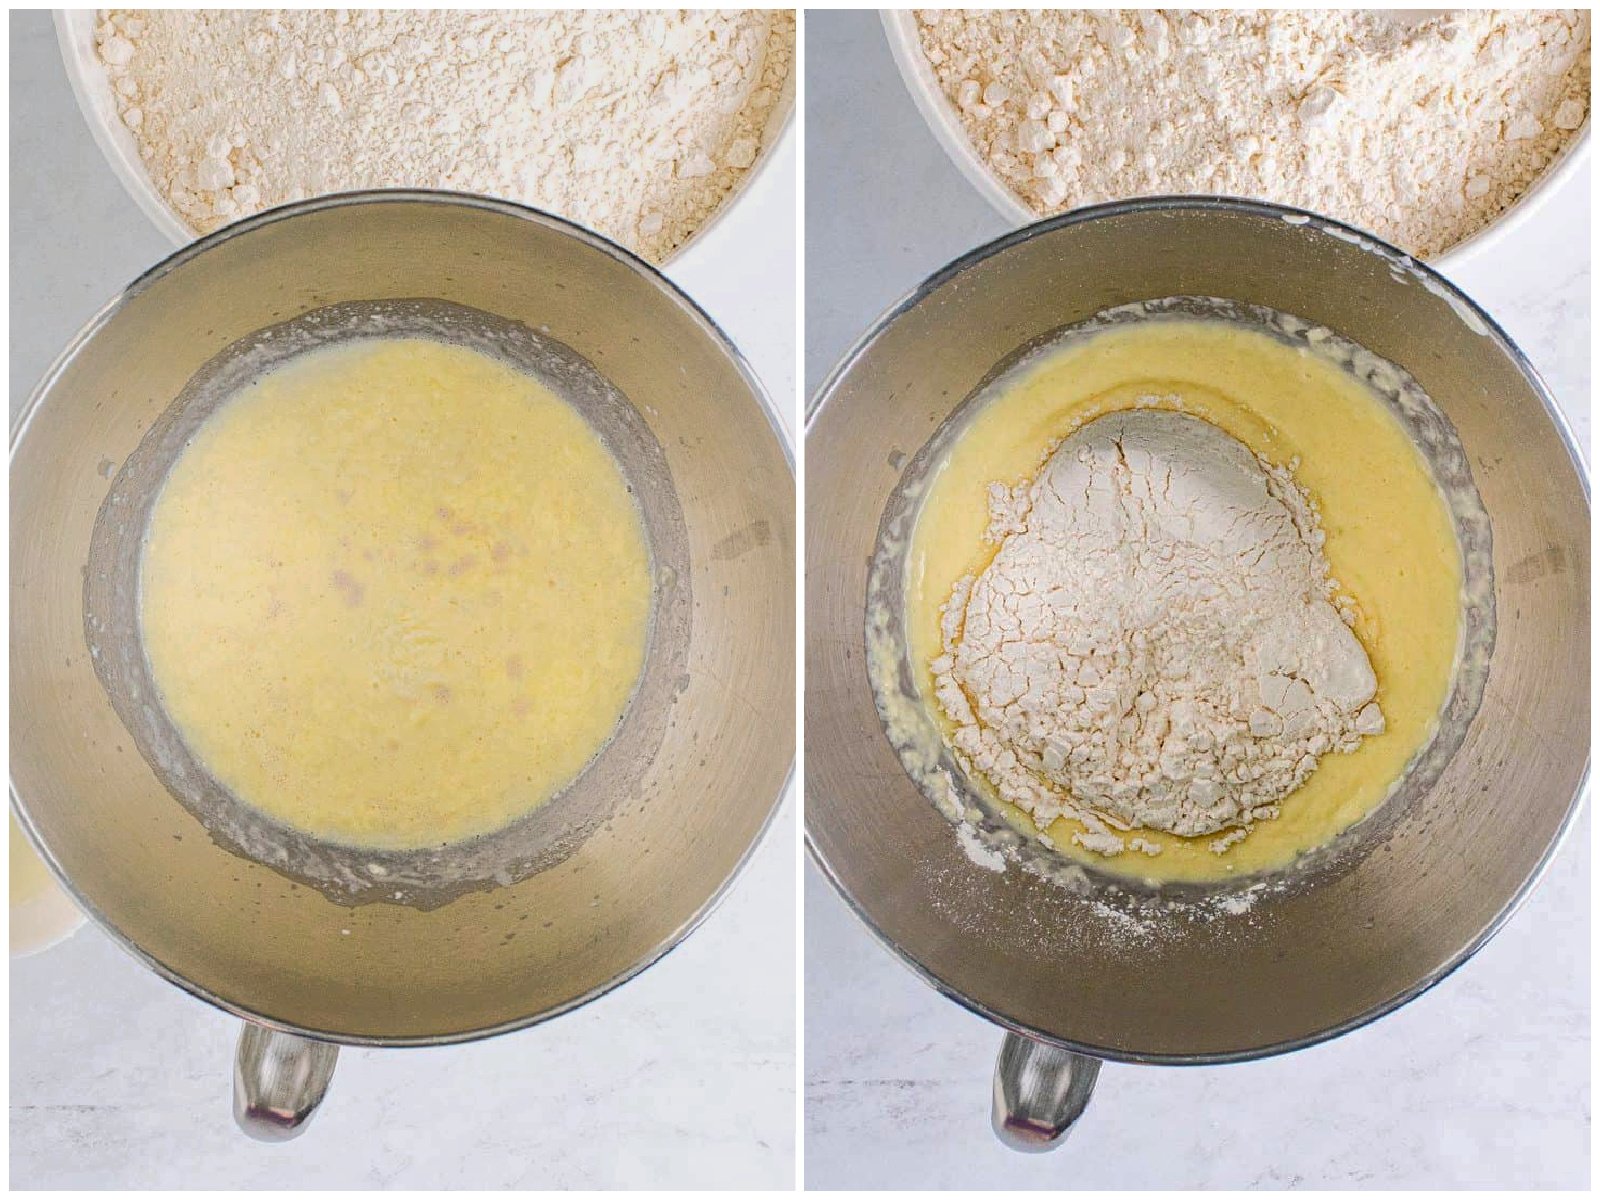
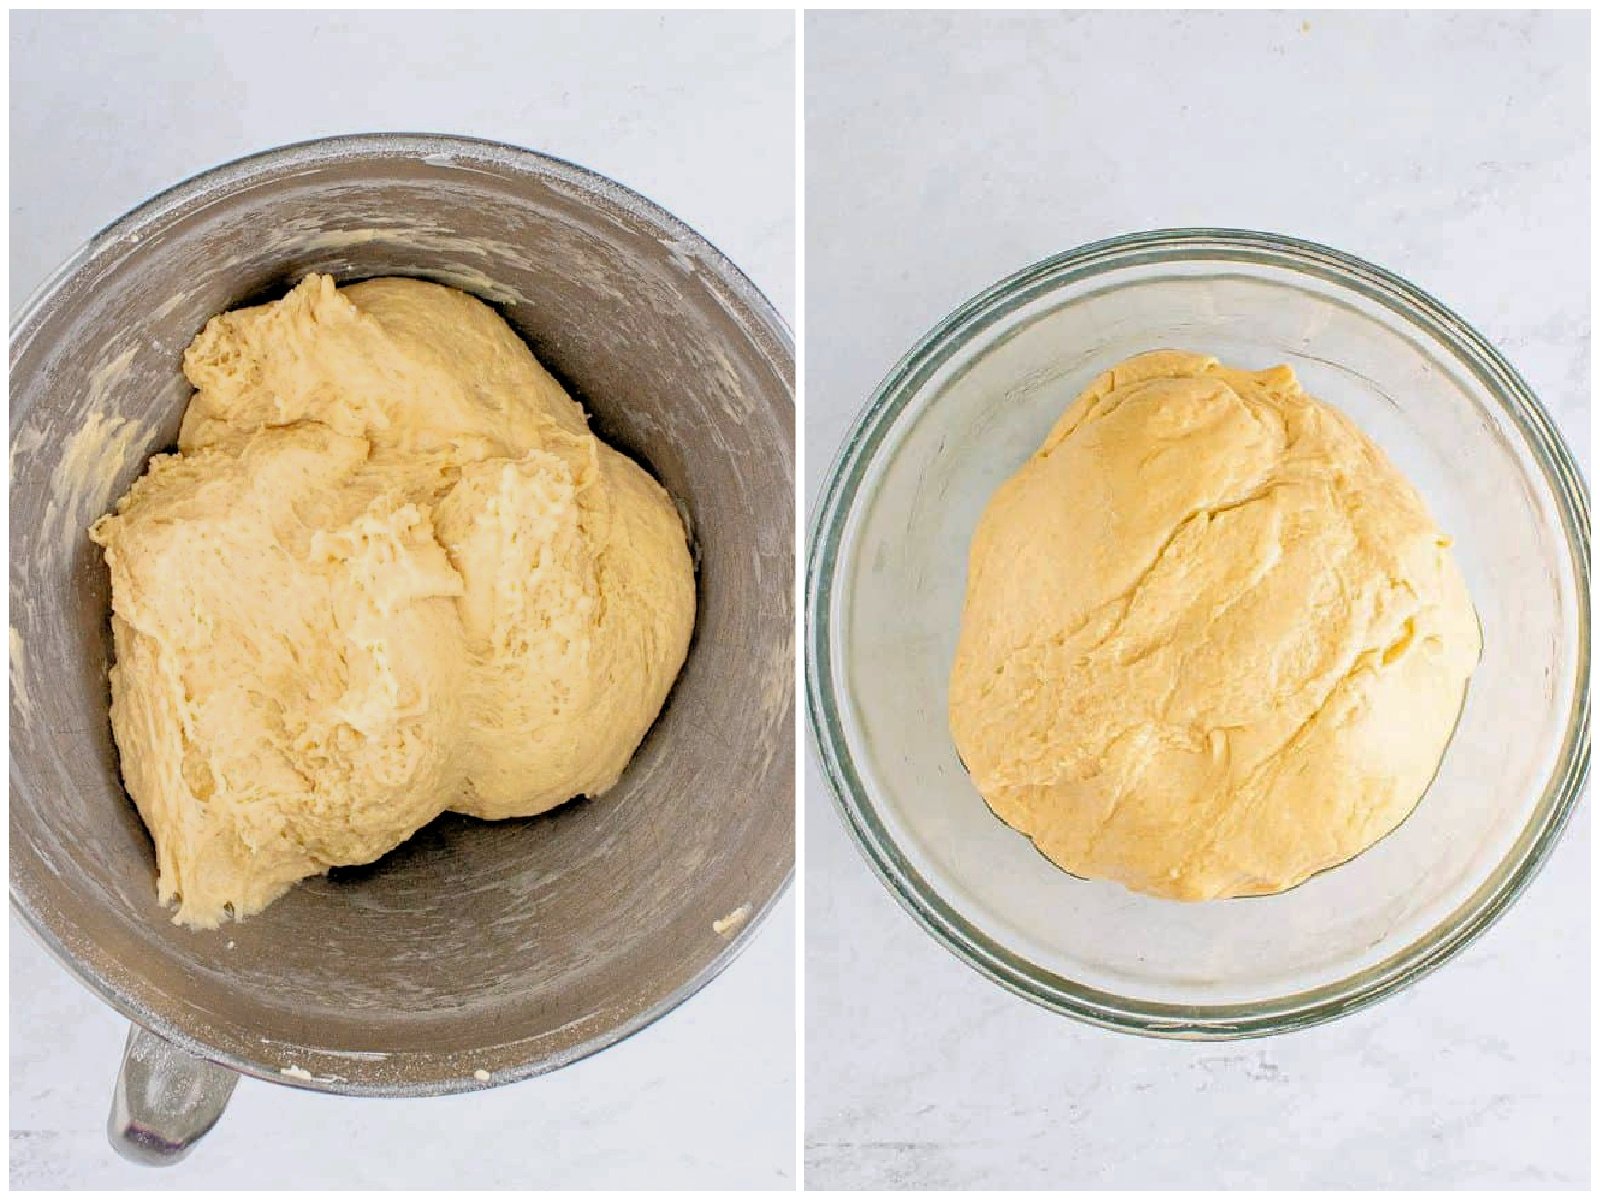
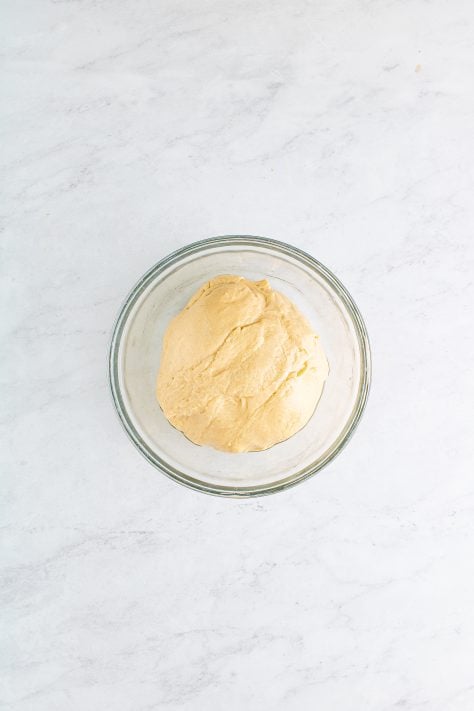
Do this until you add 3 and ½ cups of flour. Once the mixture resembles a dough, turn the speed to medium-high and start to knead it. If it doesn’t start to cleanly pull away from the sides of the bowl, add a little flour at a time (up to a half cup) until the sides of the bowl are clean. If the dough is still attached at the very bottom of the bowl that’s okay. Continue to knead for 3 minutes.
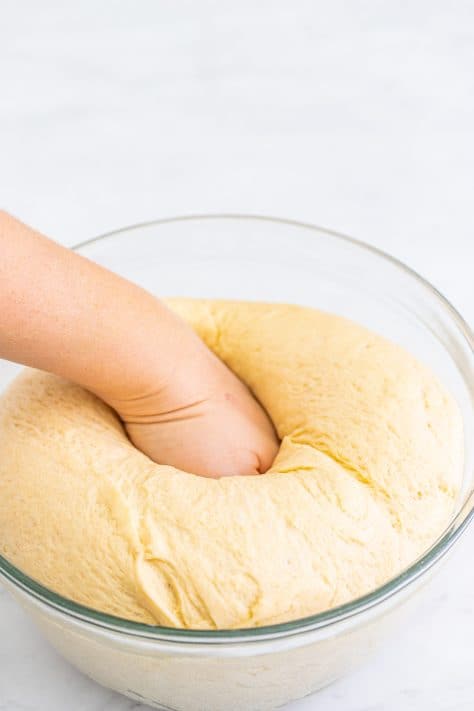
In a large bowl, add the vegetable oil. Take the dough out of the mixer and add it to the bowl with the oil, turn it around in the oil so it is coated. Cover with plastic wrap and let it rise in a warm place for 1-2 hours until doubled in size.
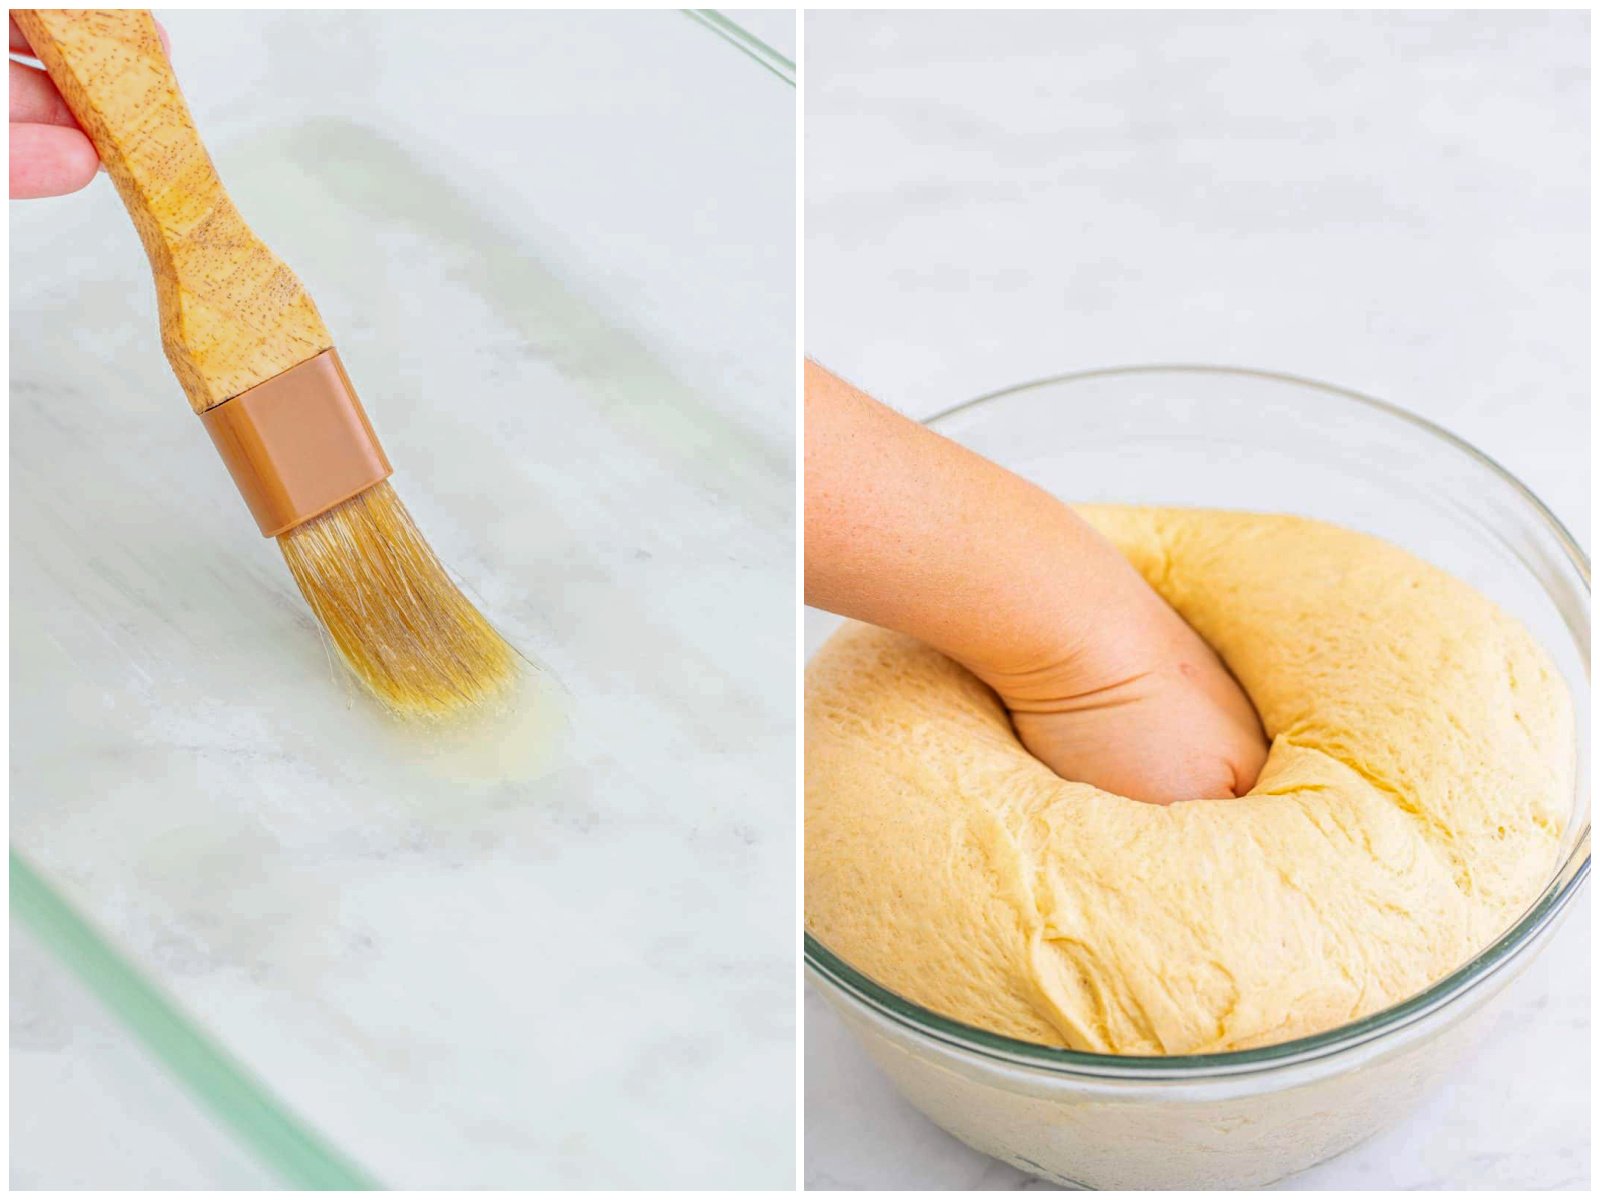
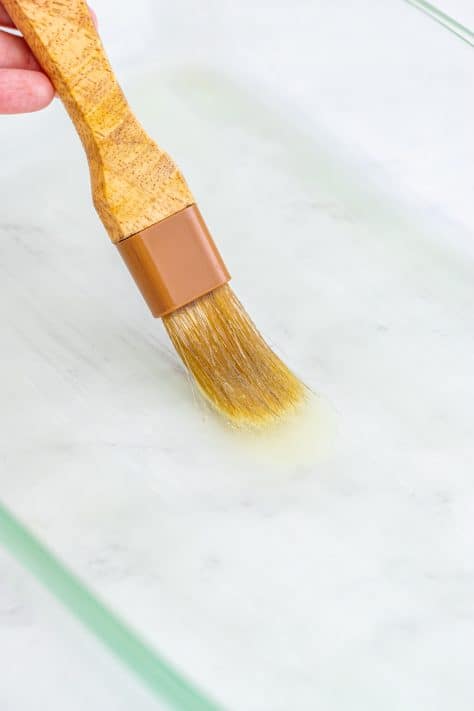
Melt the remaining ¼ cup of butter. Brush a 9″x 13″ baking dish with some of the butter, you will only need a small amount, set aside. Punch down the dough to release the air bubbles.
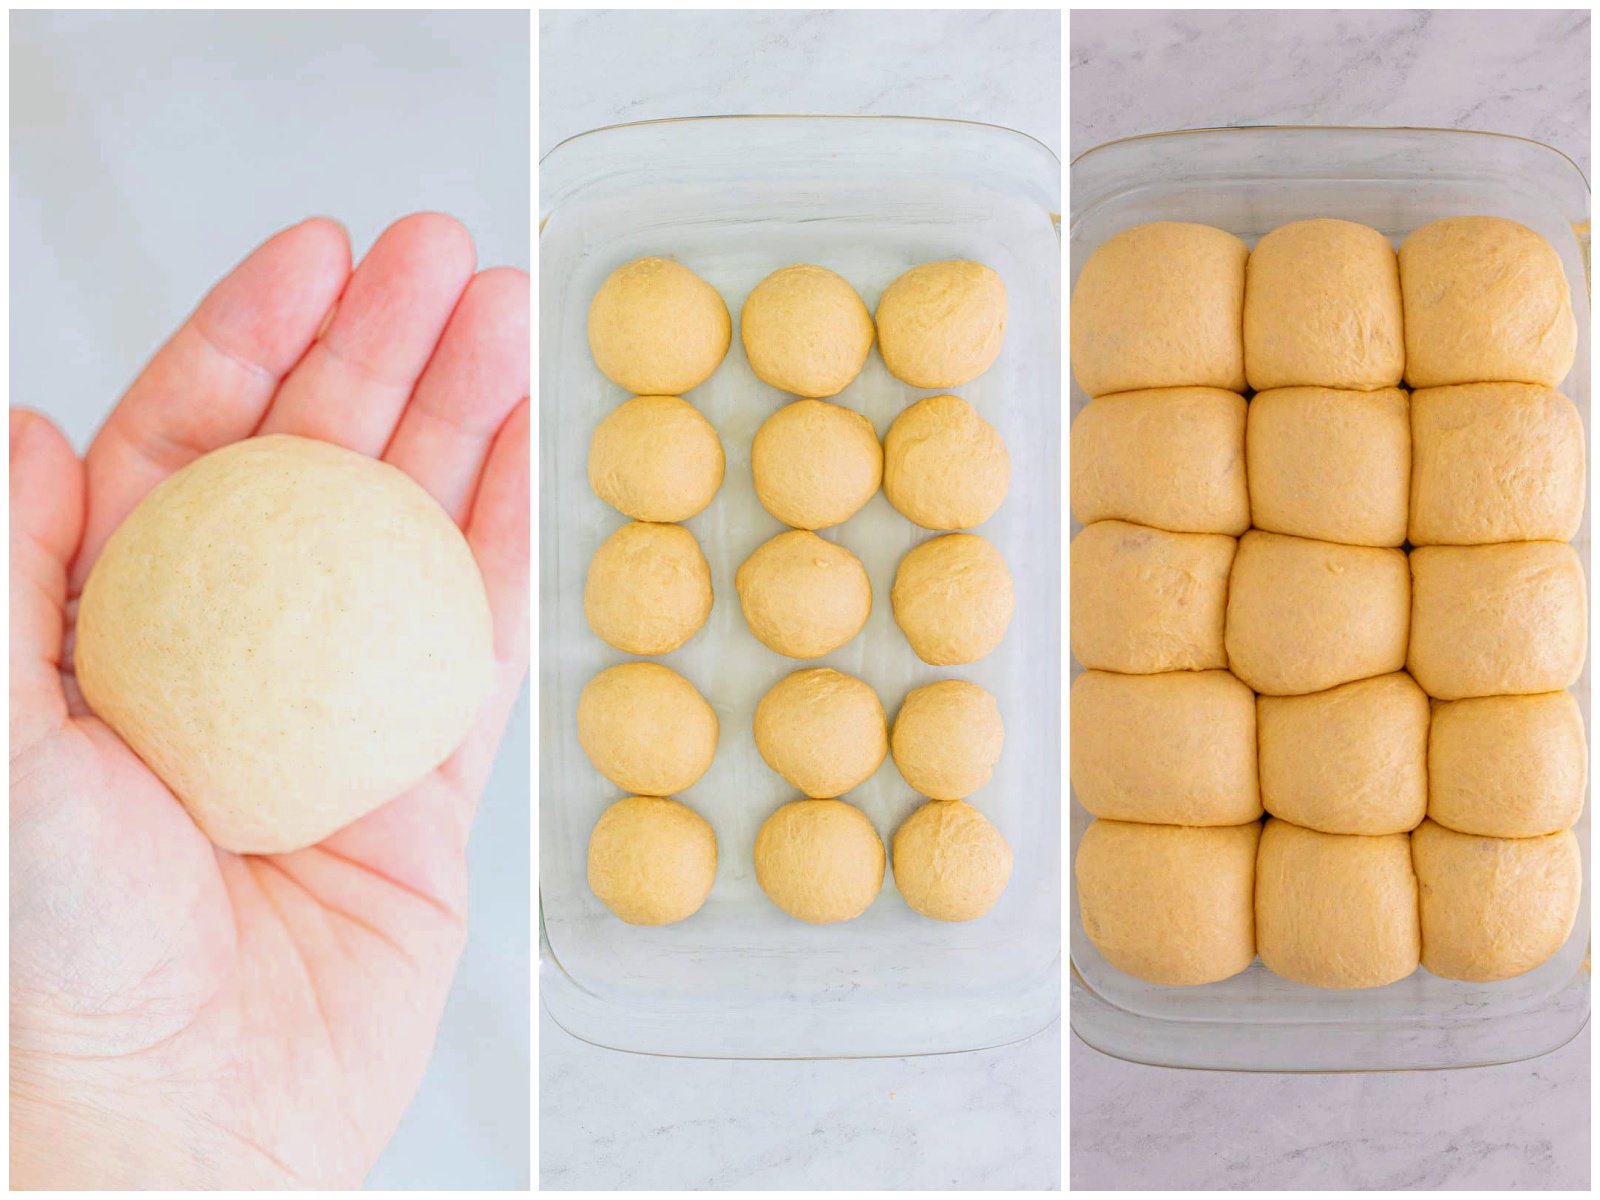
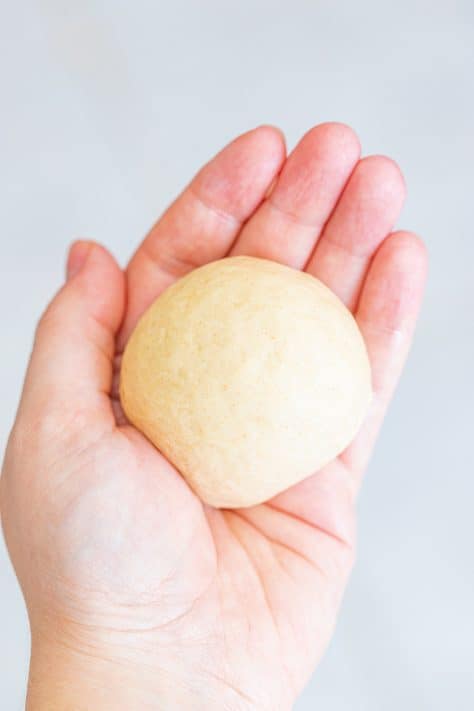
Divide the dough into 15 sections. Take each dough ball with your hands and stretch it out, tuck the ends of the dough around itself to form a smooth ball and pinch the seams together. Gently roll it between your hands to form a ball.
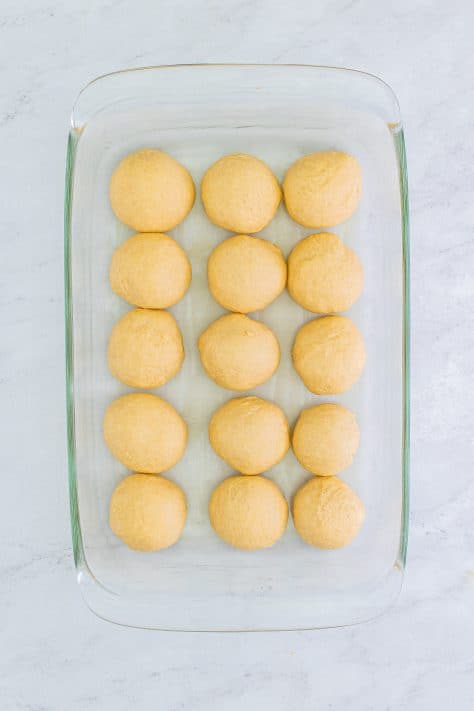
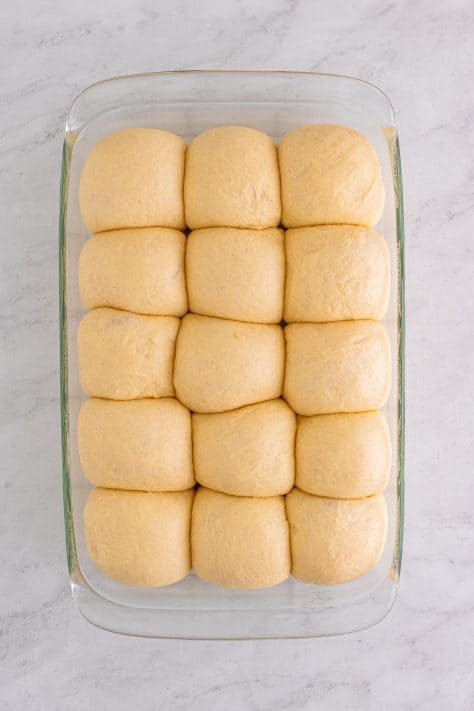
Place the ball seam side down into the prepared baking dish, 5 rows of 3 rolls. Cover again with plastic wrap and let them double in size, about 1 hour.
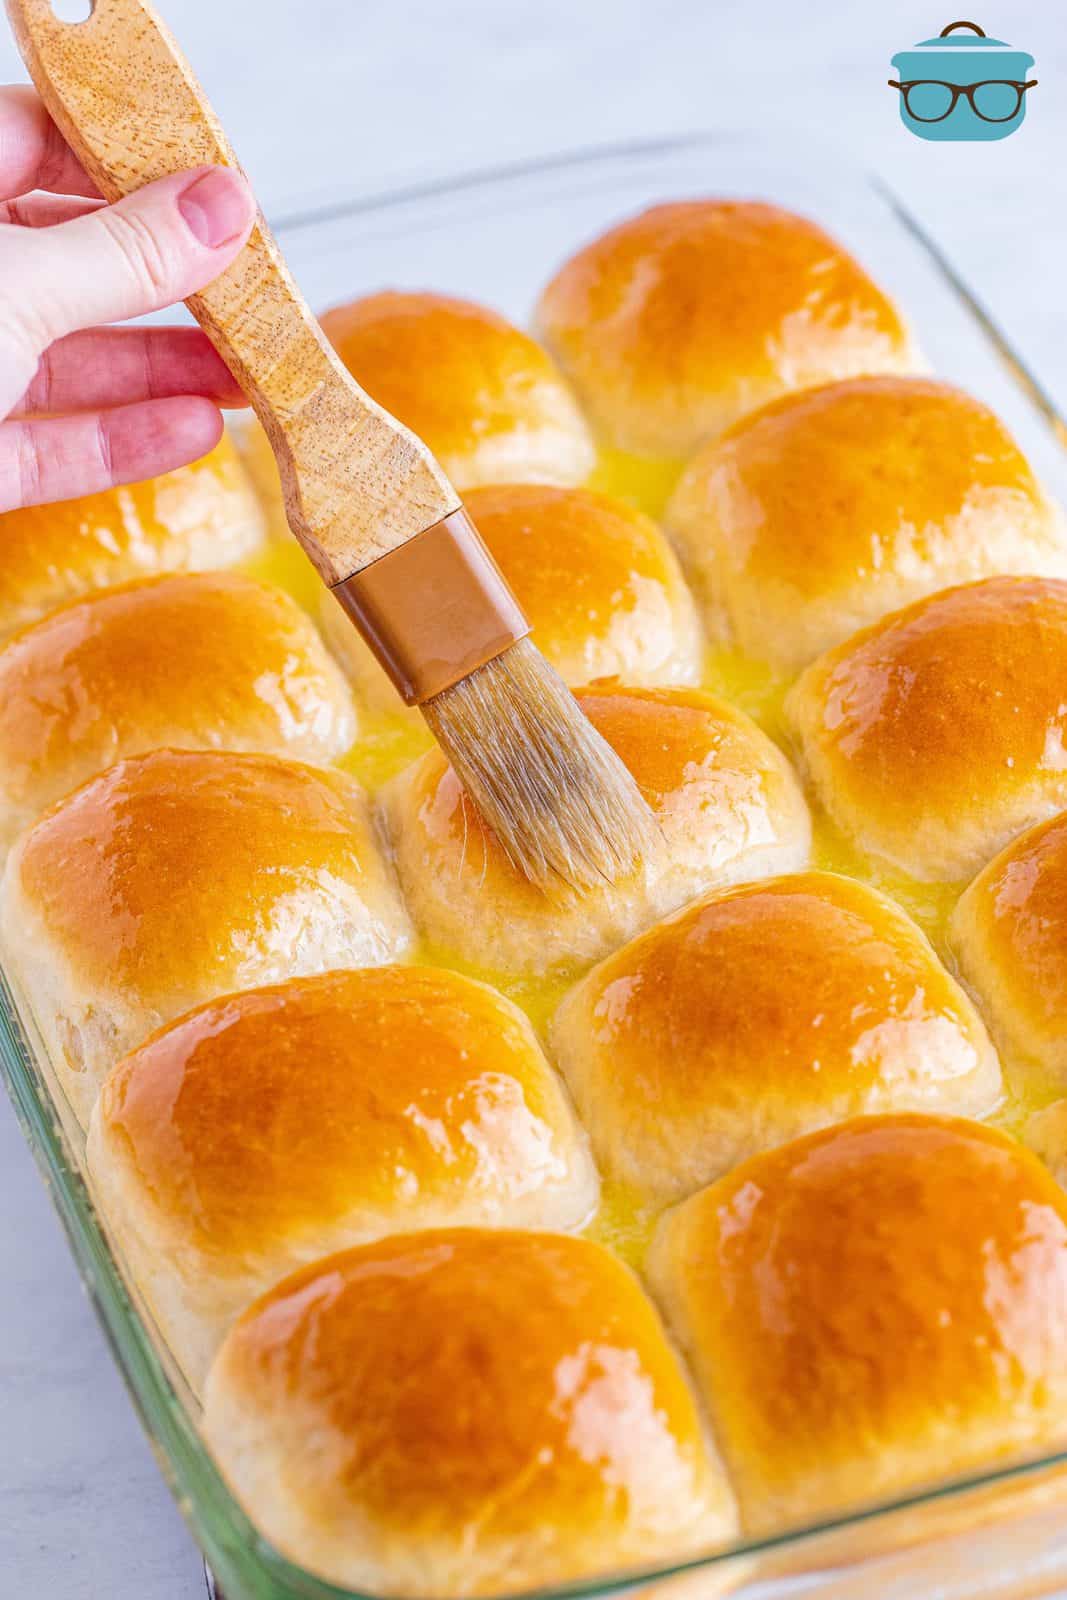
Preheat the oven to 350°F. Take the plastic wrap off the baking dish and bake for 20-25 minutes until the tops are golden brown, and when tapped, the rolls sound hollow. Immediately brush the rest of the butter all over the hot rolls.
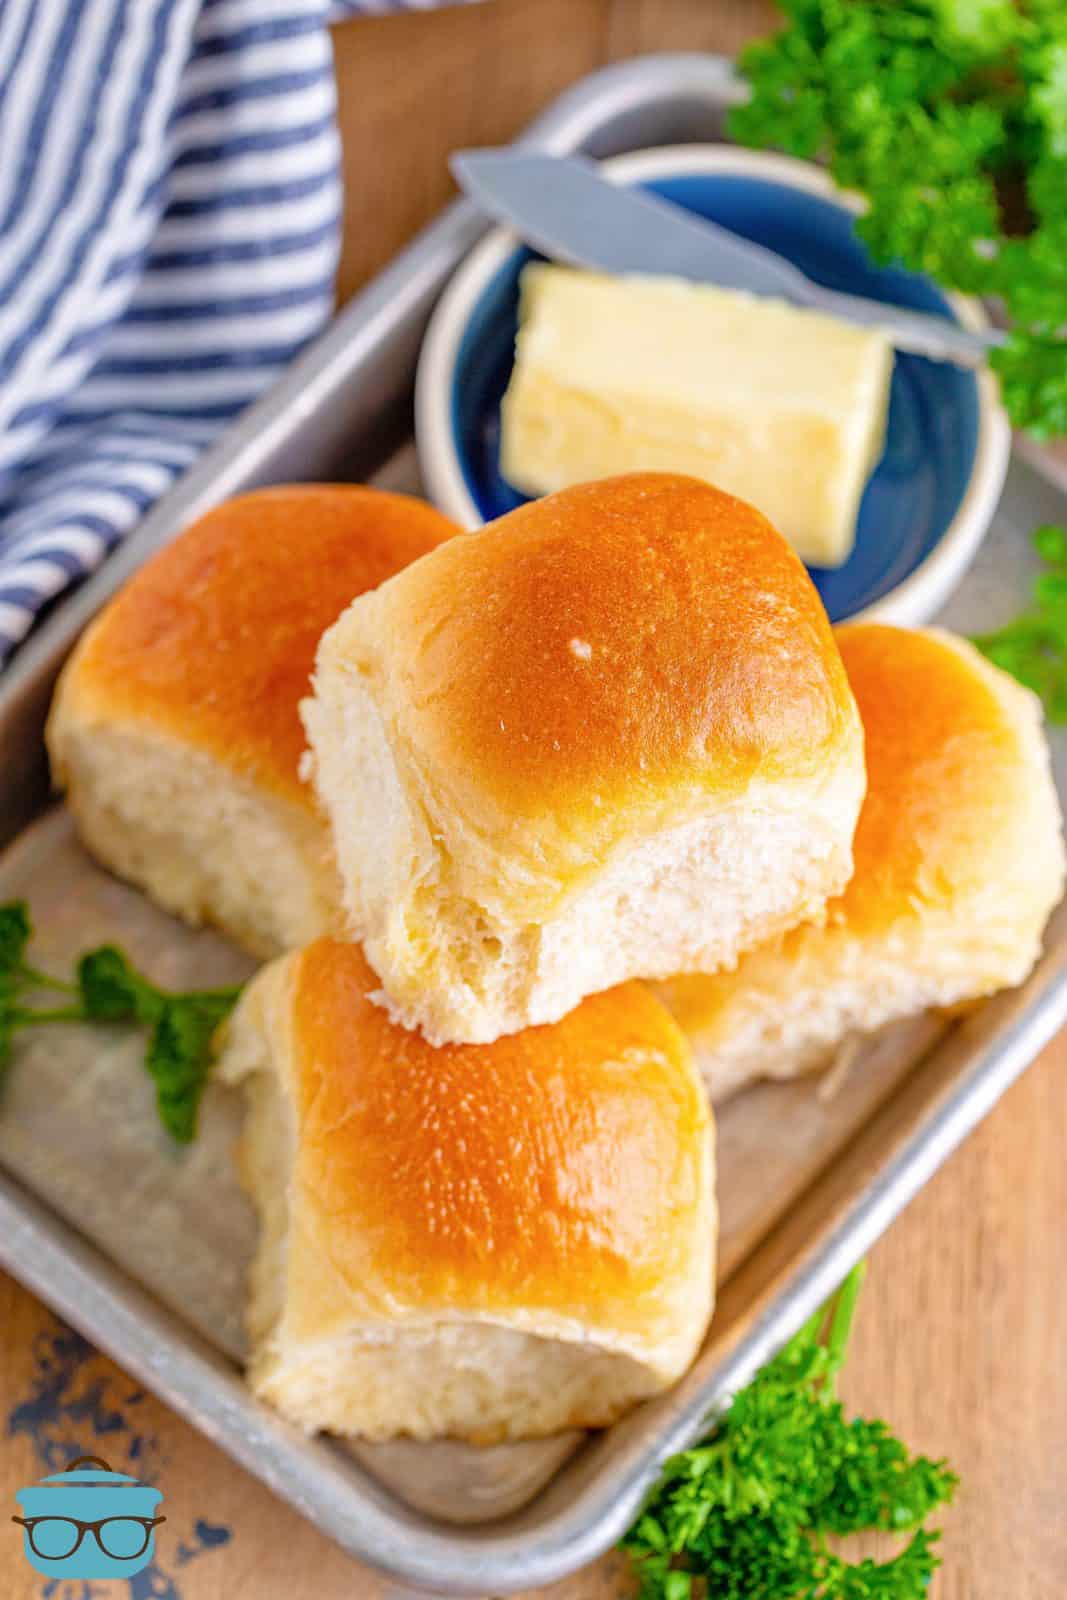
Let cool and serve.
WANT MORE RECIPES?
- Honey Wheat Dinner Rolls
- Potato Rolls
- Pizza Hut Breadsticks
- Little Caesar’s Crazy Bread
- Cheesy Garlic Bread
- Butter Swim Biscuits
- Buttermilk Biscuits
- Yeast Roll Biscuits
- 7Up Biscuits
- 2 Ingredient Biscuits
- Butter Swim Yeast Rolls
- Homemade White Bread
- Hot Cross Buns
- Homemade Whipped Butter
Originally published: November 2021
Updated photos and republished: March 2025
Homemade Dinner Rolls
Ingredients
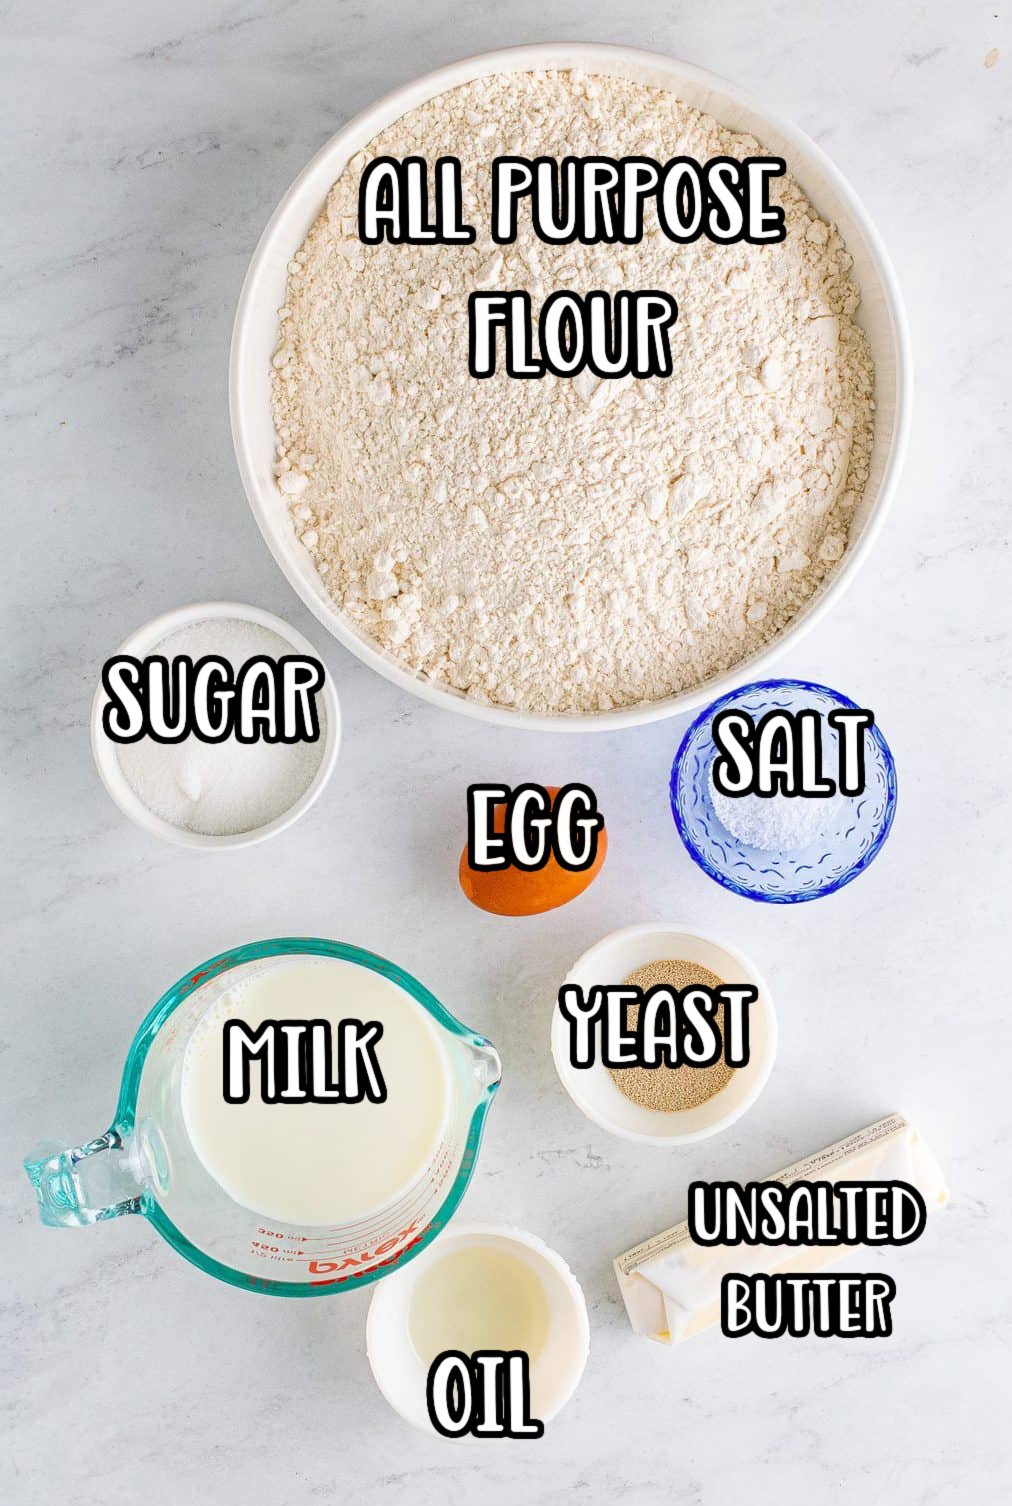
- ¼ cup unsalted butter
- ¼ cup granulated sugar
- 1 teaspoon kosher salt
- 1 ¼ cups whole milk (divided use)
- 2 ¼ teaspoons (1 packet) active dry yeast
- 1 large egg, beaten
- 3 ½ cups all-purpose flour (more may be needed)
- 1 teaspoon vegetable oil
For coating the baking dish and for topping the rolls:
- ¼ cup unsalted butter
Instructions
- Take 1/4 cup unsalted butter and slice it as thin as you can, add the slices to the bottom of a stand mixer. Add ¼ cup granulated sugar and 1 teaspoon kosher salt to the mixer.
- Warm 1 ¼ cups whole milk milk in a microwave safe bowl in the microwave. I like to do this in 15-30 second intervals. The temperature of the milk should be between 105-110°F (do not warm to over 110°F). Pour 1 cup of the warm milk into the bowl with the butter, no need to stir, just let it sit.

- Add 2 ¼ teaspoons (1 packet) active dry yeast to the remaining 1/4 cup milk and give it a stir. Let it sit for about 5 minutes, until foamy. Add this mixture to the mixer. Add in 1 large egg, beaten and stir everything to combine.
- Using the hook attachment, start stirring in 3 ½ cups all-purpose flour (one cup at a time), scrape down the sides as needed.
- Do this until you add 3 and ½ cups of flour. Once the mixture resembles a dough, turn the speed to medium-high and start to knead it.
- If the dough doesn’t start to cleanly pull away from the sides of the bowl, add a little flour at a time (up to a half cup) until the sides of the bowl are clean, if the dough is still attached at the very bottom of the bowl that’s okay. Continue to knead for 3 minutes.
- In a large bowl, add 1 teaspoon vegetable oil. Take the dough out of the mixer and add it to the bowl with the oil, turn it around in the oil so it is coated. Cover with plastic wrap and let it rise in a warm place for 1-2 hours until doubled in size.
- Melt 1/4 cup unsalted butter. Brush a 9"x 13" baking dish with some of the butter. You will only need a small amount. Set aside.
- Punch down the dough to release the air bubbles.
- Divide the dough into 15 sections. Take each dough ball with your hands and stretch it out, tuck the ends of the dough around itself to form a smooth ball and pinch the seams together, gently roll it between your hands to form a ball.
- Place the ball seam side down into the prepared baking dish, 5 rows of 3 rolls. Cover again with plastic wrap and let them double in size, about 1 hour.
- Preheat the oven to 350°F. Take the plastic wrap off the baking dish and bake for 20-25 minutes until the tops are golden brown and when tapped the rolls sound hollow.
- Immediately brush the rest of the melted butter all over the hot rolls then serve.


Video

Notes
- These can be made without a stand mixer, see my tips above.
- You can freeze these before or after baking.
- Add in some additions to flavor these rolls if desired, I gave some ideas above.
Nutrition
Nutritional Disclaimer
“The Country Cook” is not a dietician or nutritionist, and any nutritional information shared is an estimate. If calorie count and other nutritional values are important to you, we recommend running the ingredients through whichever online nutritional calculator you prefer. Calories and other nutritional values can vary quite a bit depending on which brands were used.


I had never made homemade rolls. I’ve made various breads, but never rolls. This recipe was easy to follow and came out perfect!!! I was so proud of them! Could you use this same recipe and adjust the time and make it into a sandwich loaf? I loved how soft it was and thought how good it would be for sandwich bread!
Can I use 2% milk or evaporated can milk , I don’t have whole milk and wanted to make the rolls now ?
I doubled the recipe for the Christmas lunch I made 16 large rolls. I let them rise two hours in covered pans. Tall, fluffy, and moist rolls. There were none left. My husband has me making more now. lol.
I made these rolls for my Christmas dinner they were a hit, everyone just loved them! They were delicious
absolutely perfect! I used instant yeast and salted butter and still best rolls!
I have been making these for about 3 years now. I have used this recipe to make cinnamon rolls as well they were some of the best cinnamon rolls I have ever had/made, using siagon cinnamon with a hint of fresh nutmeg and a cream cheese frosting. This recipe is so versitile am going to try puting rosemary in the dough to go with my prime rib for Christmas hopefully they turn out.
Looking forward to trying these out for Christmas dinner! Been looking for a solid yeast roll recipe. Can you use salted butter instead of unsalted?
I always use salted butter they come out marvelous
mine fell after the 2nd rise. they tasted great will have to keep trying. good weekend winter project. but super easy to make. I love them
I made these rolls for Thanksgiving and got a little nervous because the yeast didn’t bloom too well, so I made another batch with a little sugar in the milk with the yeast. Turns out, didn’t need to because the first batch came out looking and tasting like they were from a bakery! And as for the extra 15?! I’m go glad I made them, because everyone gobbled up most of the rolls and my brother insisted on taking the last six home!
Ps… I made the second batch with bread flour and the texture was slightly chewier. Thank you!
The recipe is great and easy to follow. Mine came out a bit denser than I would have liked, but I can attribute it to 2 issues: First, I didn’t have milk, so I used thinned down whipping cream, and the yeast didn’t appear to care for it. Second, I used the wrong attachment on my stand mixer (the mixer instead of the dough hooks) and absolutely pulverized the dough. The flavor is great, though, and no one complained at all, haha. I’ll definitely be making these again.
this is my 3rd (or is it my 4th?) year in a row making these rolls for Thanksgiving. Everyone is so impressed that I made these, even though I’m well known as an excellent cook, they’re shocked I know how to make baked goods. So am I honestly. These rolls are spectacular. The recipe is extremely easy to follow and always yields excellent results. Thanks for this recipe!!
This recipe was so easy! I was nervous because I can’t seem to make good bread but these turned out so good I had to bake them a second time a few weeks later to make sure it wasn’t a fluke! This time I baked mine in a foil 9×13 with a lid so they stayed fresher longer. I just happened to have one on hand because they were buy 2 get one free but I would definitely recommend it. My son said my roll game was on point which is pretty high praise from him!
I tried my hand at these rolls. I’m not a baker, but they are awesome. especially strait out of the oven, piping hot, with melted butter brushed on. nom nom nom!!!!
Wow, just Wow!! these are perfect yeast rolls. Soft, pillowy and extra yummy. These are going to be a big hit at tomorrow’s feast (If I can keep myself from eating them all today). Thank you Brandie, you saved the day as costco was sold out of rolls today…. I’m so glad because it caused me to find this keeper! Thank you for sharing.
Woo hoo!! Love hearing that Steven! I’m glad you decided to give them a try (I know that is a tricky thing to do just before Thanksgiving – ha!)
Starting your recipe tonight, anxious to try it. Looks wonderful! I use the “bake & serve” premise, bake until just before they start to brown. Next day, finish by popping back in the oven & brown, brush with melted butter. Definitely time-saving to make items ahead! I have also frozen rolls at same point. Pop the whole pan in freezer. Once frozen solid take out of pan & wrap tight to keep air out.
Can you make these rolls with bread flour?
I suppose. I never buy bread flour, I only ever have all purpose and that works perfectly for these. I haven’t tested with bread flour
I use bread flour and they are great been making these for about 3 years
First time making dinner rolls and wanted to try them out before thanksgiving and I love it so much, im excited to share these with my family!
Thank you so much for this wonderful step by step, delicious recipe!!! I made these today and although I messed up by letting the second rise go too long using a wood cutting board for a cover, they actually still came out tasty!! Will try again soon using Saran Wrap. Throw some Mike’s hot honey and YUMMMM!
can you make the dough and then make the rolls a day or so later ? if so do you refrigerate the dough ?
I did all the prep work (mixing, rising, forming into balls) then put them in fridge overnight. Pulled them out about an hour and half before baking to allow them to come to room temp and finish rising before baking. This wait time depends on how warm your house is – mine is VERY warm right now because of Thanksgiving baking. Both ovens are cranking and hot bodies are filling the kitchen 😀 If cooler house you might 2 plus hours before they double in size.
I am so happy with how these rolls turned out! I’ve never made rolls before trying your recipe. They are delicious and soft. Thank you for the step by step instructions and explaining everything so well. Everyone loved them.❤️
That makes me so happy Amanda!! Yay!!!
I made these rolls and, despite my frequent failed attempts at making sandwich bread, they turned out incredible. How might I use this recipe to make sandwich bread instead?
Just added a tad more sugar and these rolls taste like my Mama’s and Nana’s! This is now my go-to recipe!
Definitely the best bread rolls I’ve made, super fluffy! They just came out of the oven and look perfect, This recipe took only 3 hours in total, and was incredibly easy! We will be having them for our thanksgiving dinner tonight!
What brand of bread flour do you use? Also, does anyone sift the flour anymore.
I used all purpose flour and no did not sift!
My rolls are rising now. So easy to make. Beautiful dough.
These were the best rolls I have ever made!
These rolls are delicious and so easy to make! I am a senior that started making yeast rolls when I was a teenager. Our home-ec teacher taught us and then mother designated me the bread maker. Thank you for a delicious recipe that is so easy! God bless!
I helped my granddaughter make these for her 4-H project this year. Instead of vegetable oil we used a garlic, parmesan and rosemary olive oil to coat the dough and even though she only rolled the dough in it and let it rise you could get the hint of that flavor when we sampled them after baking. She got champion on these rolls and we are making them again to take to the State Fair. Thanks for the great recipe!
This is the only recipe I use for homemade yeast rolls. They turn out great every time!
first I’m a bachelor and a pretty decent cook if I say so myself but I’ve been wanting to learn how to make homemade yeast rolls and bread so I got me a stand mixer and found this recipe,first time I’ve tried to make made from scratch bread,,and I followed your recipe to the letter,,,let me tell you they came out sooo good,,i mean they are delicious and pillowy soft,,It made 15 large rolls and I love them,,I wrote this recipe down and it will definitely be my go to for home made yeast rolls,,thank you so very much
Rocky, what an amazing comment! I can’t tell you how much I enjoyed reading it and how happy I am to hear you had success! Thank you for trusting this recipe and for giving it a try, I truly appreciate it!
Made these for Easter dinner and it was an absolute hit with everyone! I made this along with another recipe and these were the winner- by far. This will always be my go-to.
That makes me so happy to read Ashley – thank you SO much for coming back to comment!
Made these for Easter. The best dinner rolls ive ever made. Im a bread baker. I bake some sort of bread at least 3 times a week. I make yeast rolls a lot. But, these….these were the absolute best, hands down, and all of my guests kept telling me how good they were. Saved the recipe, and will never use another. Thank you so much! These are the most delicious, and soft rolls, ever!
These rolls are absolutely amazing! This was my second year making them for Easter and everyone couldn’t stop saying how delicious they are and that I needed to continue to bring them!
Made these today for Easter and they came out great. My mom used to make these by eye and I don’t have that talent so thank you for the recipe
Best rolls ever! Loved all your instructions & photos and video. It was so helpful. Thank you for all you do to help us make the recipes successfully!
I will never make rolls another way again. Absolute best roll I have ever made (and I am an old lady who has made a lot of rolls in her time – ha!)
Please let your followers know you absolutely can use instant yeast for your awesome rolls recipe! I’ve made your recipe on different occasions using either regular or instant yeast, and no matter which yeast I use, they always turn out fantastic! For the instant yeast, you can choose to prove or not prove, and for me it only required about 30 minutes of rise time for the dough, and then another 30 minutes after shaping the rolls. This way in case your readers go to make this recipe, but find they only have instant yeast, or if they are in a pinch and don’t have enough time to wait for the slow rise method, they can still use it with your wonderful recipe to create some fantastic rolls! Thank you so much for the recipe!
My family and I love these rolls i’m wanting to make some for Easter, but I would need to double the ingredients do they still come out good if it is doubled
I would just make two separate pans. Just to make sure they bake evenly. So happy you love these!!
How long does it take to bring the rolls back to room temporature from the fridge? We have a turkey trot and I am concerned I will run out of time in the morning. Just trying to time it all!
Do you mean after baking? I’m not sure I’ve ever refrigerated them so I’m not sure honestly. Can’t imagine too long. I’m guessing an hour?
Best rolls I’ve ever made – ever!
Could I use some whole wheat flour in these rolls? Will it make them dense?
It will. Whole wheat requires more liquid. I’m working on a recipe for whole wheat rolls now so I’ll post those soon! 🙂
That was a great tip to not be bothered by dough left in the bottom of the mixer as the dough hook rotates. I would have been tempted to add more flour. As it was I only added about 2 Tbs. to get the dough off the sides and when I went to put it into the rising bowl I was so happy at what a beautiful soft lovely dough that came right out of the bowl. Not sticky just soft. So don’t be tempted to add too much flour. I baked for exactly 25 minutes and they are scrumptious. This is my forever recipe.
I needed a better recipe and found you! Big hit!!! I won’t ever use anything else.
Awww thank you Maria – yay!!
Thy were very good. My family loved them.
Can this be made with spurdough discard instead of commercial yeast? If so, how much should I use?
Never tried it sorry
I’ve noticed when I bake breads with discard I always need to add about half the amount of yeast still as what the recipe calls for to get a good rise. I made these tonight with just yeast though and used instant and didn’t wait the 5min. for it to bloom since using instant and they came out PERFECT with only 1hour per rise.
I made these exactly how the recipe was written (had to add a little more flour) and they came out perfect!!! This is a keeper
wish I could take a picture but I did a little over quarter cup sugar and warm/hot water in bread maker then stired in yeast packet. let fluff up then added sliced butter and mixed egg then flour. as it mixed i added about 3 tablespoons or more warm milk so not dry…was amazing
I wish I had that option on here too! But you were still so sweet to come back and comment Nadine. I really appreciate it!
looks just like my mom made in the 60s can’t wait make them my self let you know how they turn out